Glyphs是近几年,字体设计行业内最热门的字体创作软件。
最近Glyphs迎来了一次重大升级,版本号变为3。同时也发布了新的Logo,过去的“G”Logo,一去不复返。有人甚至调侃说:“之前的G图标贴纸,将会变成绝版的了。”

关于价格,据说购买过Glyphs 2.***的版本用户,可以半价购买Glyphs 3 。但我自己还没有升级,所以不确定价格的真实性。大家个可以自己去官网了解一下。
我印象中2.0时代的价格是1000多,作为优秀的正版软件,价格是可以接受的。
言归正传,由于自己需要了解软件更新后的特点,而官方又没有中文版本的介绍,所以顺手翻译了一下,方便自己的同时,也希望能给设计圈朋友们做个参考。
英文水平实在有限,很多不当之处,还请各位专家指正。
进入正题,以下是原文与译文对照:
Glyphs 3: Make Things You Love
Together, we have come a long way. Now is the time to make things you love. Welcome to Glyphs, version 3.
Glyphs 3: 做你喜欢的东西
朋友们,我们已经并肩走了很长一段路。现在是时候做点你喜欢的事情了。欢迎来到全新的Glyohs 3。
In its third major iteration, Glyphs has become more customizable, more user-friendly, more stable, more efficient, smarter and, above all, more script-neutral than ever before. After three years of intensive development, we are more than happy to make version 3 available to you.
Have you been using Glyphs before? Let us give you a rundown of what is new in Glyphs 3.
这是它的第三次重要迭代,在这次升级中Glyphs变得更加可定制、更友好、更稳定、更高效、更智能,最重要的是,它比以往任何时候都更“中立于脚本”(script-neutral)。经过三年的深入开发,我们非常乐意为您奉上全新的Glyphs 3。
你以前用过Glyphs吗?让我们给你简要介绍一下Glyphs 3中的新功能。
New icon, new app start
Say hello to the new app icon:
新的图标,新的软件。
来跟新的图标打个招呼吧:
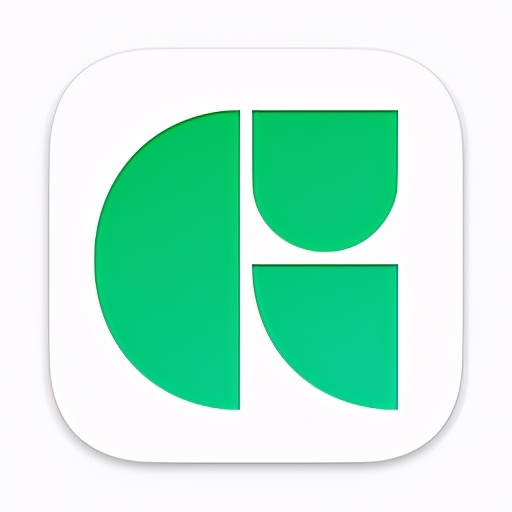
We hope you like it as much as we do. In the design process, together with Italian-American designers Andrea Trabucco-Campos and Matteo Bologna, it grew on us so much, we were missing it when we did not have it in our dock.
So, let’s double click that app, shall we? When you start Glyphs without documents, you are presented with the new Start Window:
我们希望大家都能喜欢它。在设计的过程中,意大利裔美国设计师Andrea Trabucco-Campos和Matteo Bologna让软件有了很大的改进与提升,如果全新的Glyphs 3没有出现在你的程序坞中,我们将错过很多精彩的内容。
好了,让我们双击图标!就现在!
当我们启动软件后,会发现一个全新的开始界面:
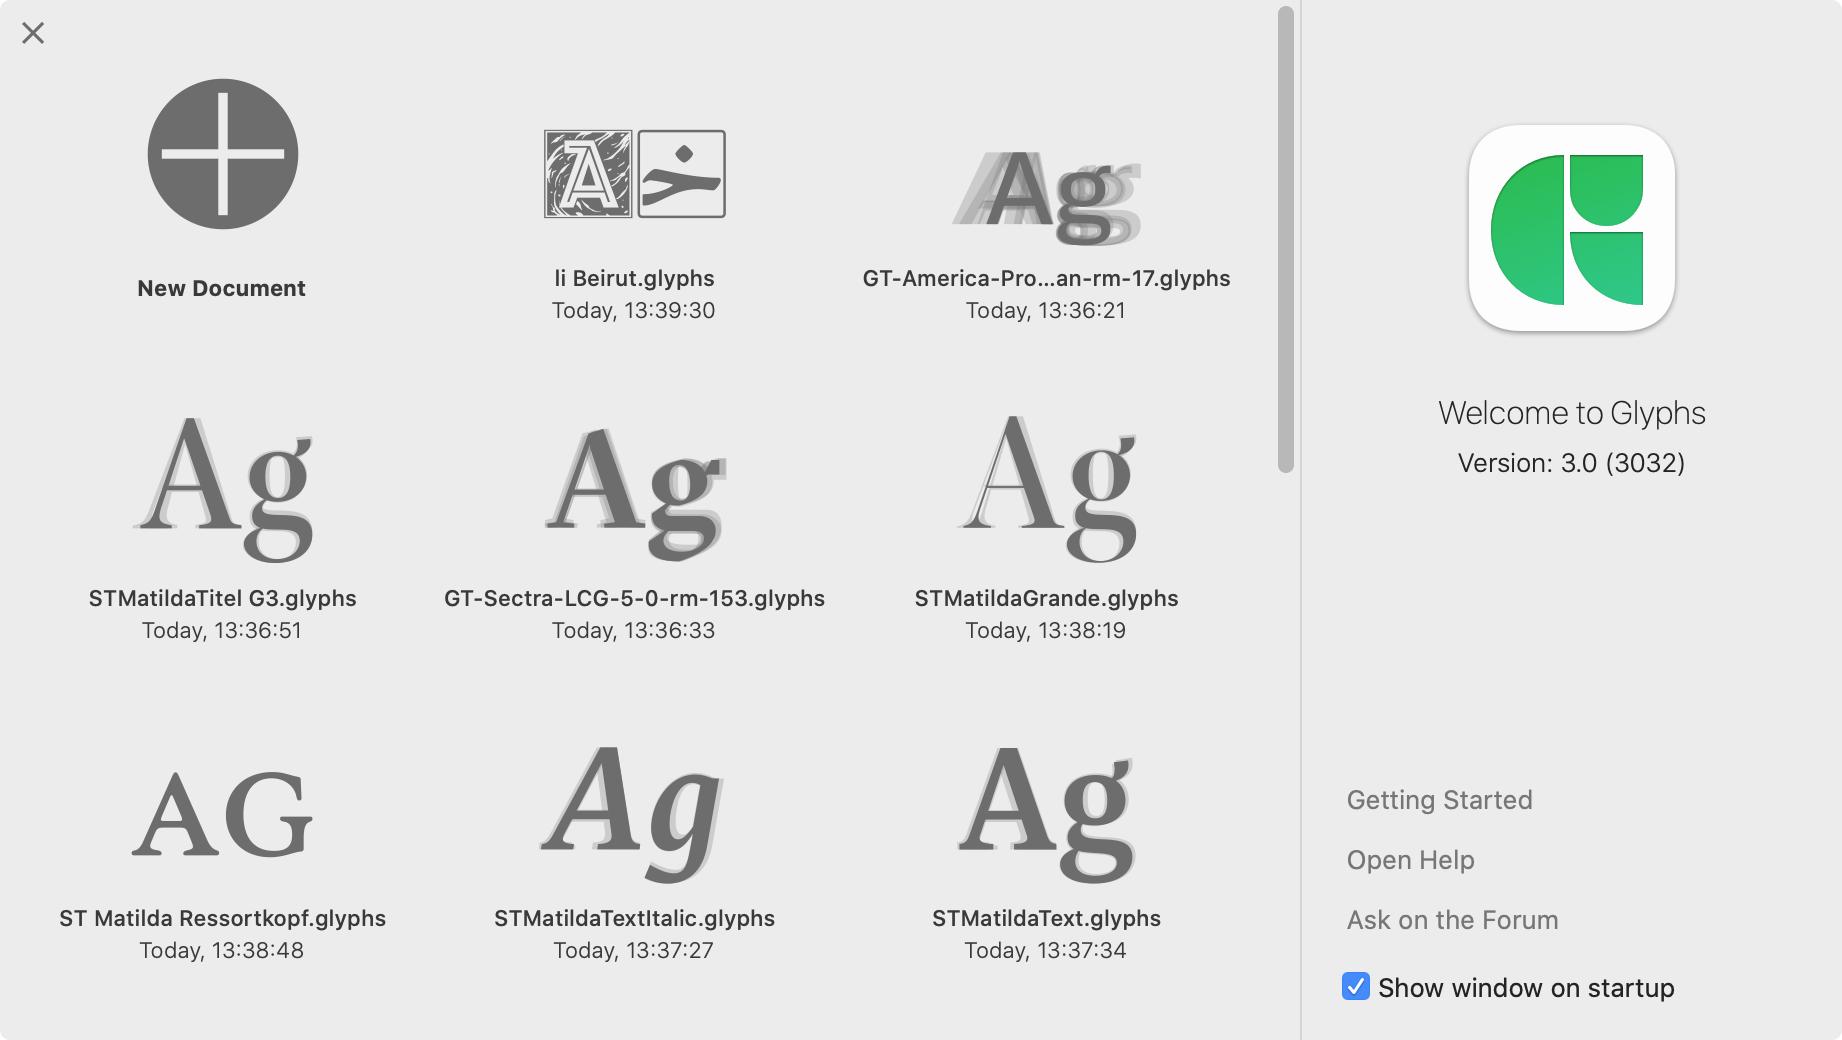
You see, you are presented with options to create a new document, open a recent file, and with helpful links to the website. You can invoke the dialog later with Window > Start Window. If you choose to create a new document, you can start and build your font with the glyph sets you want:
你看,我们可以新建文档、打开以前的文件或者打开一些在线帮助文档。也可以在 “窗口-开始窗口 中显示开始界面。如果选择新建文档,则可以选择所需的字符集立刻开始创作:
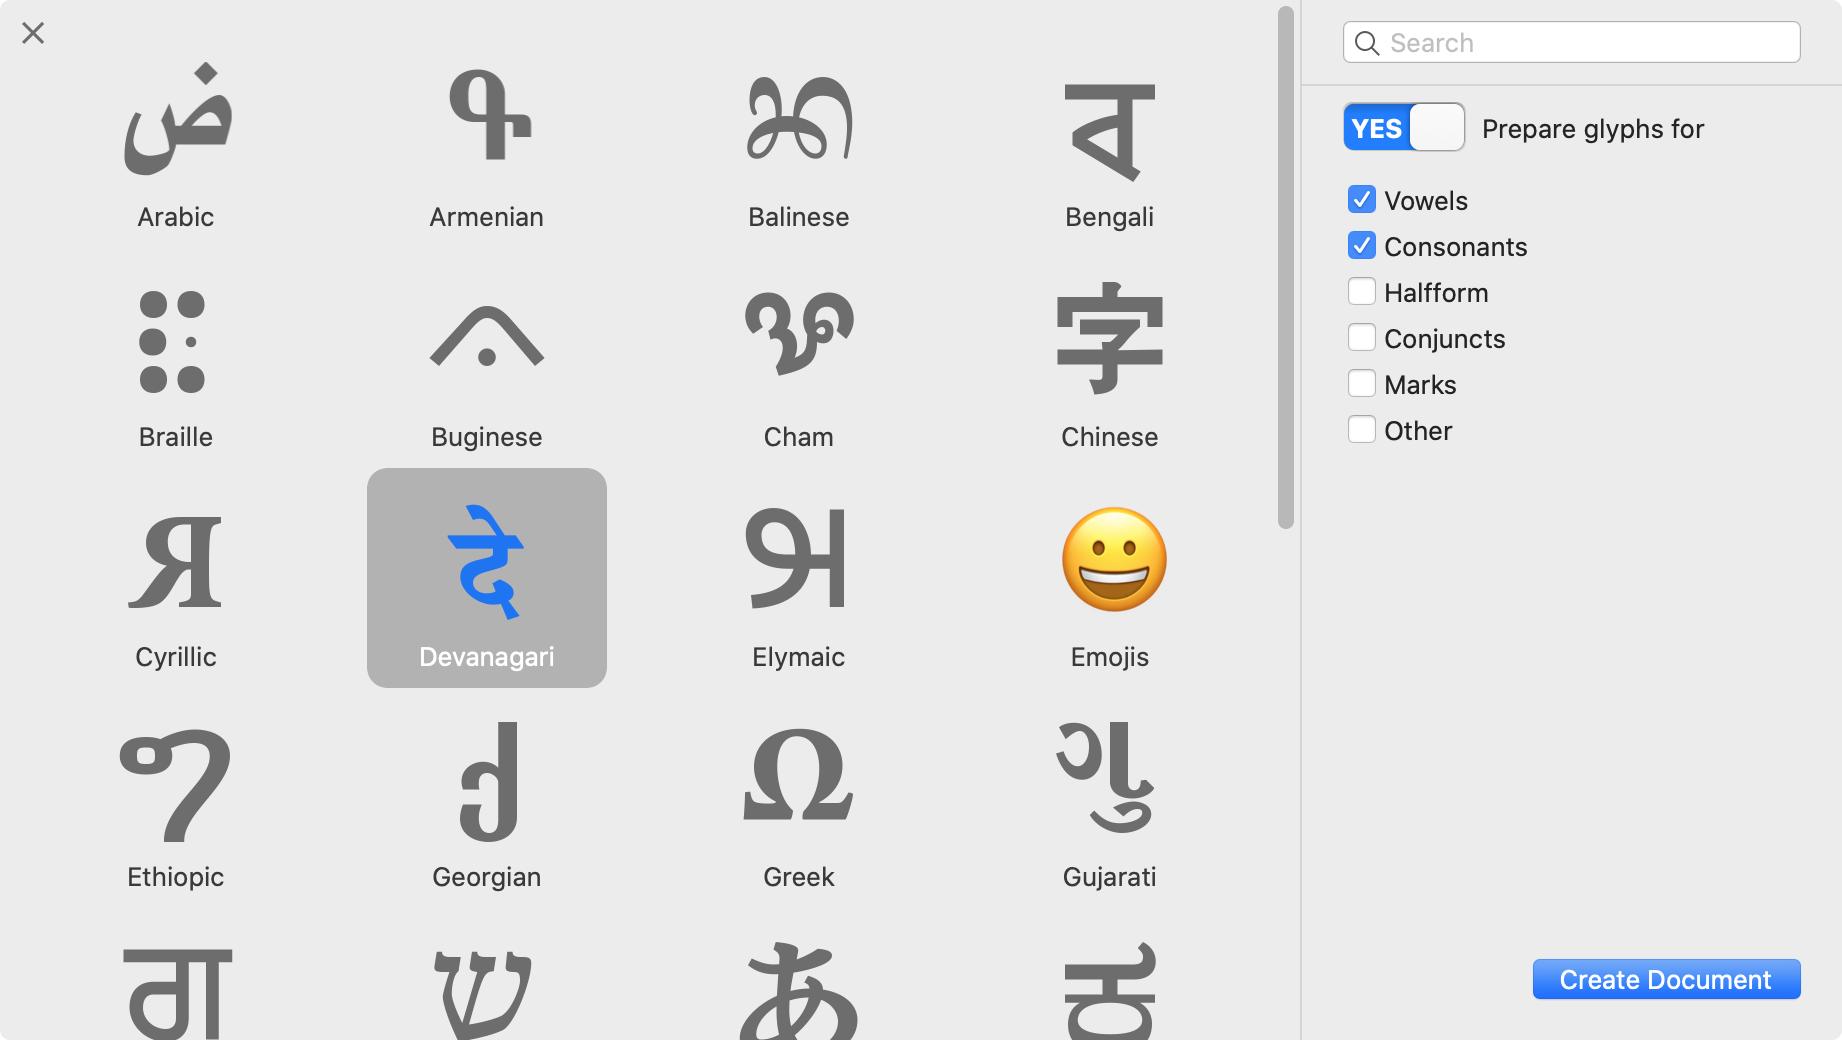
If you choose to deactivate the splash screen at start-up, you can also invoke the document builder directly through File > New from Glyph Sets…
Good, so let’s start drawing.
如果选择了“下次启动不显示”,则每次启动软件后,将看不到开始界面。
那么在哪里可以找到“开始界面”呢,在 “文件-从字符集创建文档” …
好了,让我们开始创作吧。
Drawing and shaping
Switch to your Draw tool (P), start drawing a path, and hold down the Cmd key while you are dragging handles. You will lock the length of the counter handle, enabling you to draw asymmetric smooth handles:
绘制与造型
使用钢笔工具(P),开始绘制路径,拖动控制手柄时按住Cmd键。可以调节一边的手柄,而另一边不会改变,以此来保持曲线的平滑:
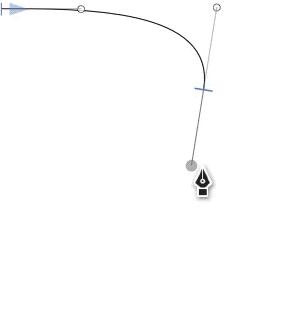
Needless to say, you can combine it with the space key to reposition the triplet of points while still holding down the mouse button.
不用说,你可以组合使用空格键,在按住鼠标的同时,重新定位三元组的点。
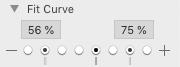
Speaking of curves, we have revamped the Fit Curve palette. The plus and minus buttons allow you to increase and decrease existing curvatures. The small vertical indicators below the buttons show current handle lengths of all selected curve segments. That way you have some orientation before you choose a new curvature.
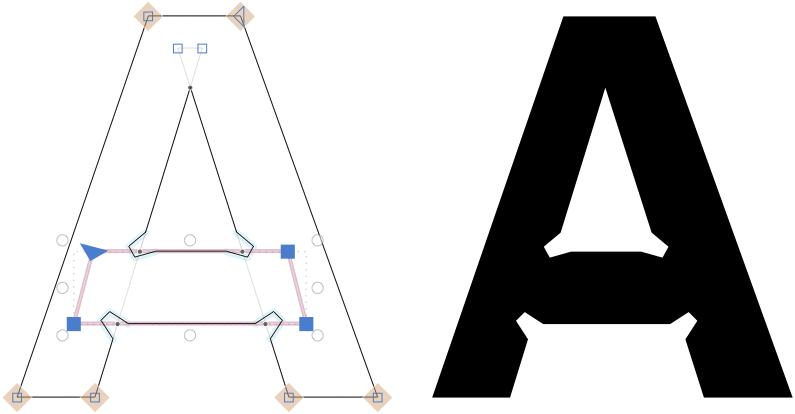
View > Show Nodes > Extra Nodes shows predicted intersection points. That means, you can add corner components on them without removing overlaps first. Great for non-destructively adding ink traps, for instance:
说到曲线,我们修改了拟合曲线面板。+和-按钮能够增加和减少现有曲率。按钮下面的竖线显示当前控制手柄的长度。这样就可以在选择新的曲率之前有一些参照。
“显示-显示节点-显示额外节点”,这意味着,可以在这些点上添加“转角构建”,而不用去除重叠的部分。非常适合在笔画交叉处添加挖角,而不用破坏字型。是一种非破坏性的修改方式,例如:
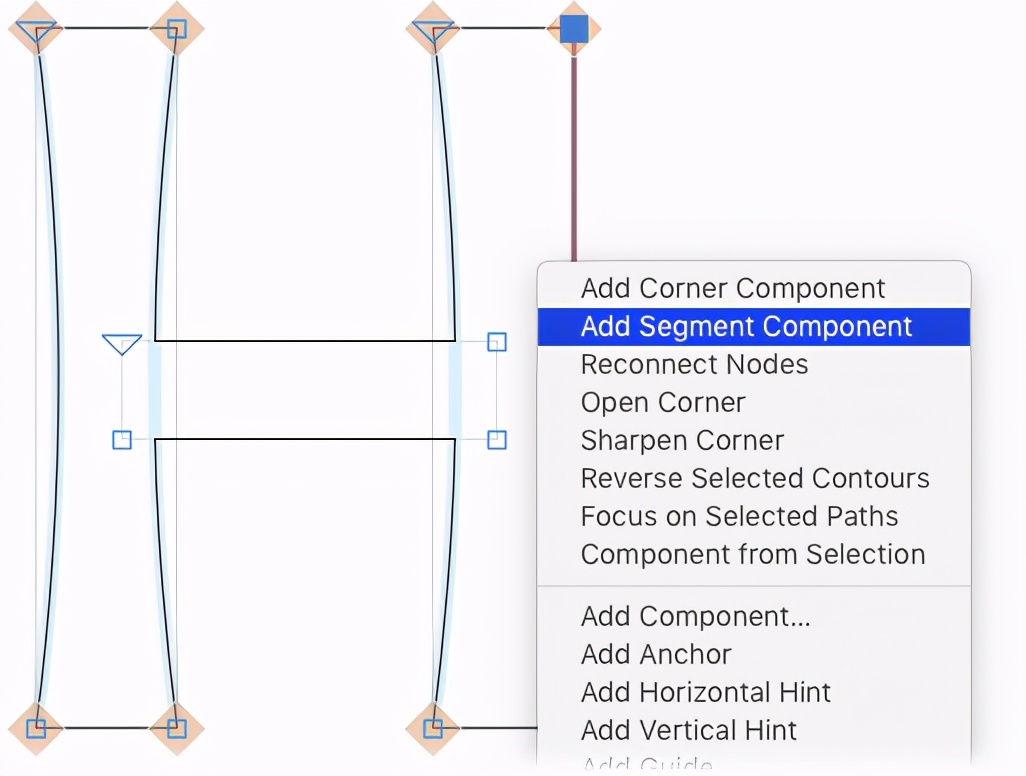
You can now add… ta-daaa: segment components! Create a glyph with a name that starts with _segment, add a dot suffix to its name, draw an open path and add anchors (Cmd-U). Then select a segment in a host path and choose Add Segment Component from the context menu:
请看,现在我们能添加“段组件”了!创建一个以 _sefment开头的字符(glyph),在名称中添加一个点后缀,绘制一个开放路径并添加定位点(Cmd-U)。然后选择一段路径,从右键菜单中选择 “添加路径组件”
This way you can inject the same open path into path segments of the host paths. This allows you to keep tapered stems in sync, or draw more complex bits, e.g., for Tuscan designs.
这样,就可以将相同的开放路径插入到主体中的任意一段路径中。这可以就可以让控制手柄一只保持同步,或者绘制更复杂的局部。例如,Tuscan 这类风格的花体字。
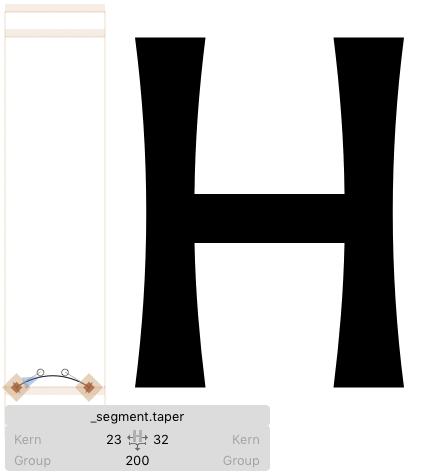
Decompose selected segments via the context menu. And the best of it all: it interpolates, and exports to variable fonts too! Read the tutorial about segment components.
You can now apply closed outlines in a _brush glyph as brushes on segments. They will be stretched and bent onto the receiving path segment. So you can do cool stuff like this:
通过右键菜单,拆分选定的部分。最棒的是:它添加的这些变化内容,可以导出为可变字体!
更详细的内容,请看tutorial about segment components教程。
现在,我们可以在 _brush 字符中添加闭合轮廓形状,作为路径的笔刷。笔刷可以被拉伸并弯曲到路径上。所以,我们可以做一些很酷的设计,像这样:

It does not matter whether the receiving path is closed or open, and whether the segment is a curve or line segment. Again, you can decompose via the context menu. Read the tutorial about brushes.
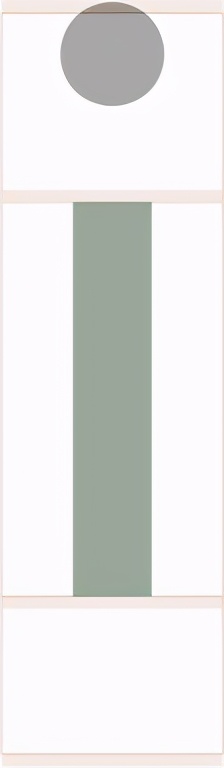
Also, classic components now indicate their alignment with a subtle color tint. Automatically aligned components are displayed green, unaligned components are shown in a simple grey. In this example, the dotaccentcomb is unaligned, while the base letter idotless is automatically aligned:
无论路径是闭合的还是开放的,或者线直线或曲线,都可以应用笔刷。同样,你可以结合右键菜单,使用此功能。详情请阅读tutorial about brushes.
此外,经典显示组件对齐插件将用一种细微的颜色差别来体现对齐方式。自动对齐的部件显示为绿色,没有对齐的部件显示为灰色。在这个例子中,dotaccentcomb 没有对齐,而字母的基础部 idotless 是自动对齐的:
In Glyphs 3, you can non-destructively apply a live stroke width and other to a path. Select any open or closed path, and in the bottom right corner of the window, you will find a Stroke panel:
在Glyphs 3中,你可以在路径上非破坏性的应用实时的笔画宽度和其他路径模式。选择任意的路径,在窗口右下角,你将看到这个笔画(Stroke)面板。
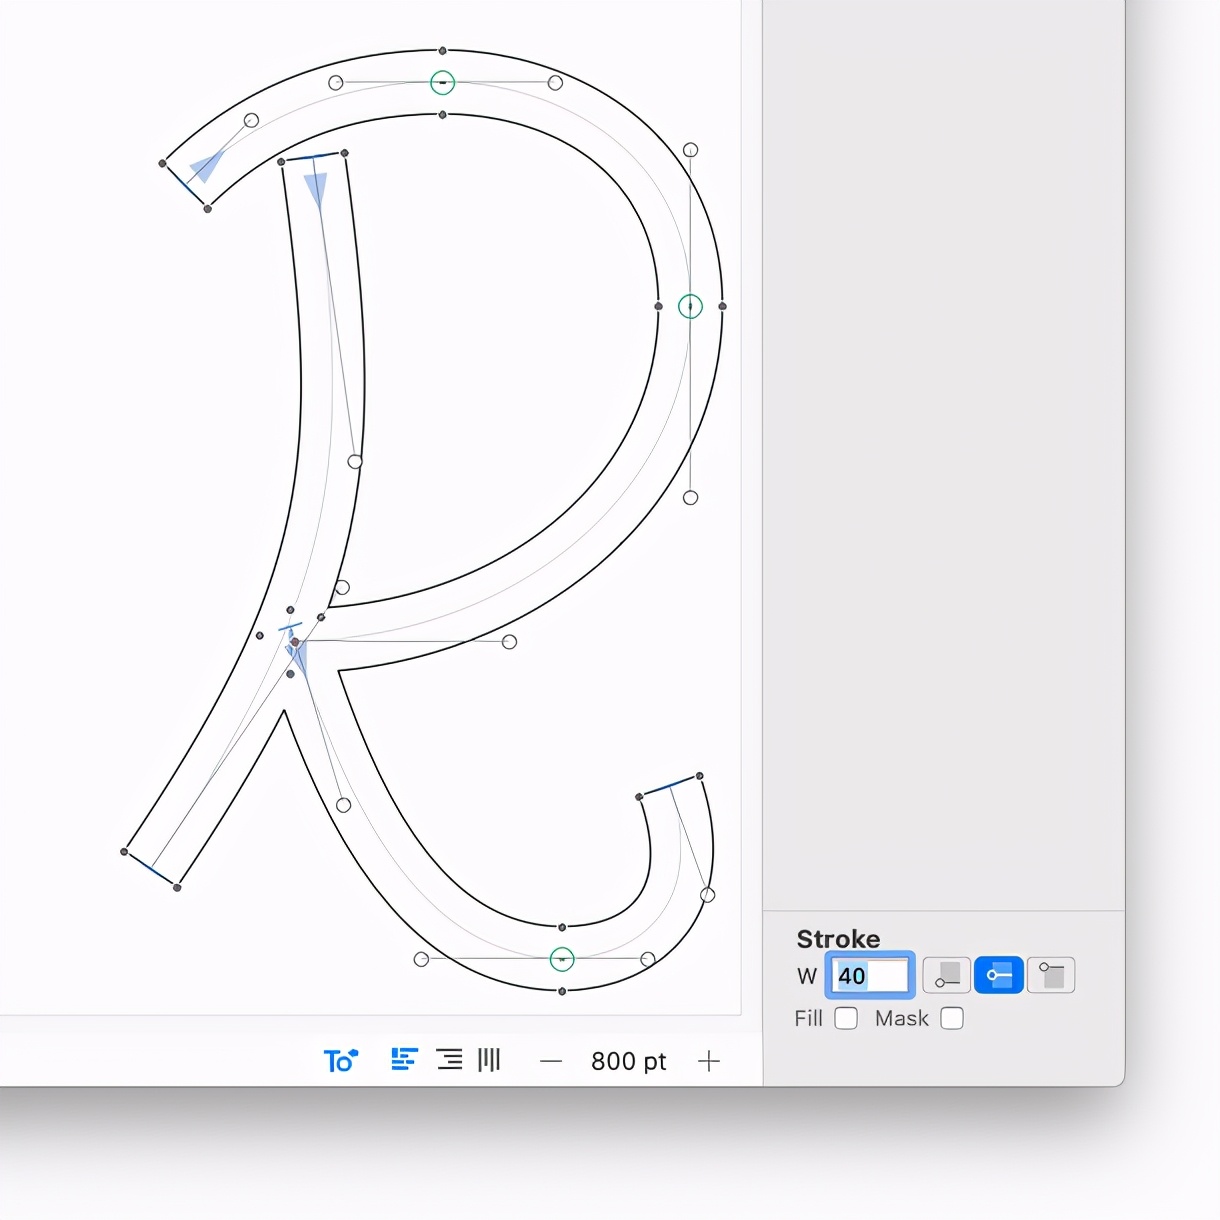
In the past, this has been possible already with filters like Offset Path and their respective custom parameters. But now, it is live and visible within Edit view, and you get to apply all kinds of graphic attributes:
Stroke width: width of the expanded stroke in units.Stroke placement: inside, outside or expanding equally in and out. The latter will spread half the expansion on the outside, and half inside. However, if it is an uneven number, the outside expansion will receive the extra unit. Example: 11 units will result in an expansion of 5 units on the inside, and 6 on the outside. If you want a more precise distribution, consider a higher Subdivision in Font Info > Other.Fill: fill color or gradient of a closed outline. Only available on a Color Layer.Mask: if a closed path is defined as masking, then it will be subtracted from any pre-ordered shapes. Control shape order through Filter > Shape Order. Useful for stencil designs, and for illustrations.Stroke endings (available both live and in the Offset Path filter): select a path ending (the first or last node in an open path), and then choose any of the available line butt styles displayed on the little buttons in the bottom right corner.Once you have set up a graphic style of a path, you can Copy and Paste Attributes from one path to another via the context menu. Also through the context menu, you can Expand Outlines in order to get the closed final outlines as they would appear in the exported compiled font.
在过去,类似“路径偏移”这样的功能可能是以滤镜的形式出现。但是现在,它是可视化编辑,实时可见的。我们可以实时编辑他的各种属性:
●笔画宽度:以某个值为单位,展开笔画宽度;
● 扩展位置:内、外或者居中扩展。但是,在居中扩展中,如果设置的数字不能被平均分成两份 ,那么有一半的扩展将大于另外一半,例如:扩展设置为11个单元,那么内部会得到5个单元的扩展,外部扩展将得到6个单元。如果需要更加精确的分布,可以在Font info-Other中进行更高的细分设置。
● 填充:对于封闭路径的颜色填充或渐变。只能应用在颜色层上。
● 遮罩:如果封闭路径被作为遮罩使用,那么它将从所有预制形状中被减掉。通过滤镜-形状顺序来控制图形的顺序。适用于模板或插图绘制
● 笔画末端(在“活动路径”和偏移路径中都可以使用):选择一个路径终点(开放路径的起始点或终点),然后选择右下角的按钮上显示的选项,应用所选样式。
● 设置路径样式后,可以通过右键菜单将属性从一个路径复制和粘贴到另外一个路径。此外,通过右键菜单,我们开可以展开“大纲”(Expand Outline),以获得闭合路径的最终轮廓,这些轮廓将在导出的字体中显示。
Editing
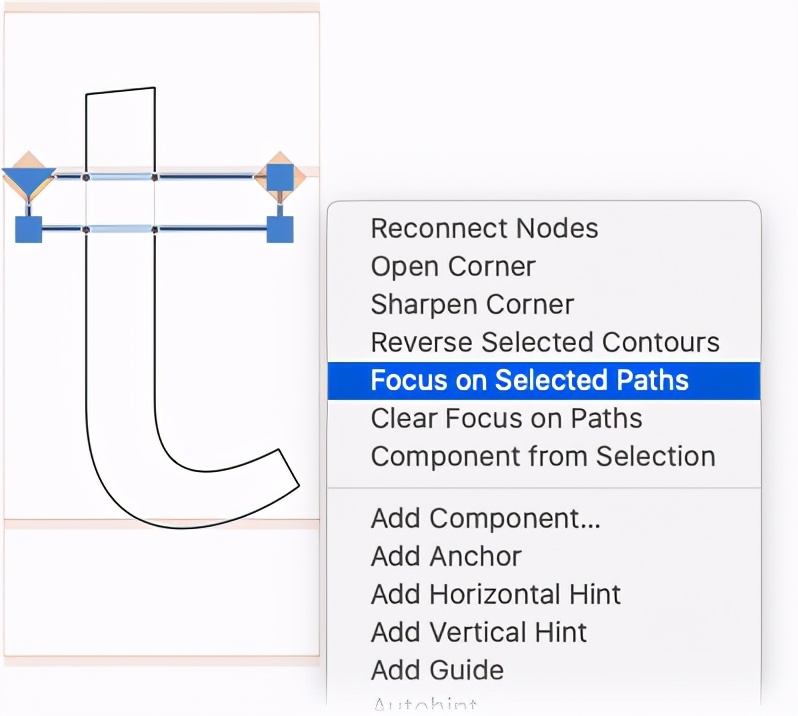
You can focus on paths now. While editing a complex glyph, you may want to exclusively edit one path, and keep the other paths as they are. Select the path, or a part of it, then choose Focus on Selected Paths from the context menu:
现在我们可以专注在路径上了。在编辑复杂的字形时,我们通常希望可以独立编辑一条路径,而不会影响到其他路径。选择路径或者路径的一部分,然后在右键菜单中选择“独立编辑选定路径”(Focus on Selected Paths):
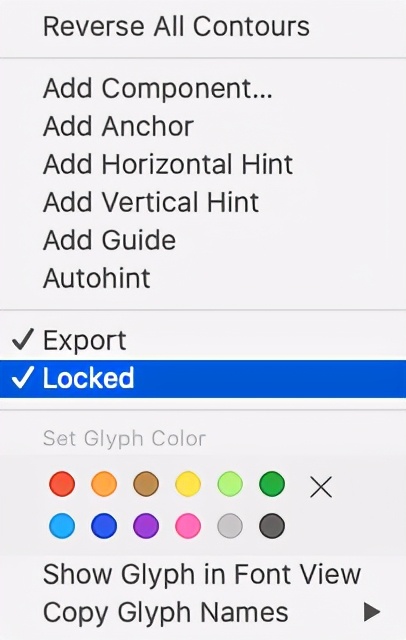
Or lock a glyph when you are finished editing it, and you want to prevent accidental edits later. Again, open the glyph in Edit view, and toggle the Locked status in the context menu:
或者在编辑完字形之后把它锁定,防止意外的误操作。如果想再次编辑,可以在“编辑”视图中打开这个字形,并在右键菜单中取消锁定:
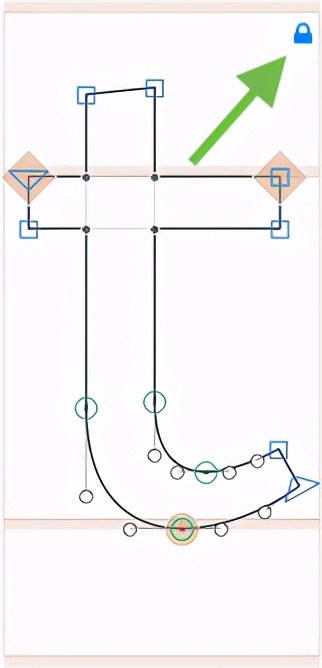
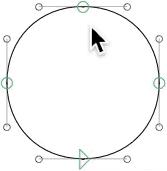
A small lock indicator in the top right, both in Edit View and the Font View cell will show you the lock status of the respective glyph:
在编辑视图与字体视图中,字形的单元格上会有一个小锁图标,代表字形被锁定:
If locking the whole glyph is too much, just lock a path. As you would expect, all you need to do is click on a node of a path, then choose Lock Path from the context menu:
如果不需要锁定整个字形,而只需要锁定一条路径,那我们可以只单击路径的锚点,然后在右键菜单中选择“锁定路径”即可。
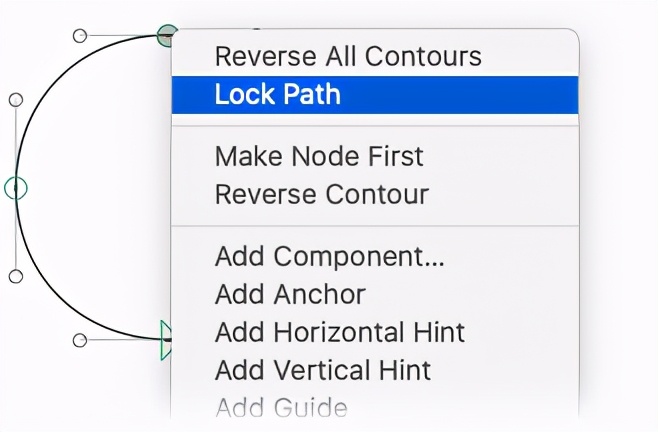
Next time you try to drag a node with your mouse, it will not let you. Instead, the node just gets a red highlight:
下一次用鼠标拖拽这个节点的时候,此节点将不能被移动。当鼠标移动到这个节点上时。节点会显示为红色,以提醒此节点被锁定。
Unlock the path again through the context menu. The corresponding menu entry is, you guessed it, Unlock Path.
What used to be the function for ‘making’ a corner is now called Sharpen Corner and available in the context menu. Segments adjacent to the current point selection are continued until they intersect. Great way to get rid of a serif, for instance.
Some menus are restructured. Transformations and Remove Overlap have moved into the Paths menu. The secondary functionalities of Transformations are now split into separate, more accessible menu items, and we put them where they belong. First of all, Glyph > Transform Metrics:
想解锁节点,一样可以通过右键菜单解锁(Unlock Path)。
过去,用来“生成“角的功能,现在叫“锐化角”,在右键菜单中。与当前点选方式相邻的线段,直到他们相交为止,这是去除衬线的好方法。
有些菜单的位置发生了变化。“变换”和“删除重叠”已经移动到“路径”菜单中。
“变换”(Transformations)的次要功能变成了独立选项,且更容易找到。首先你可以看看Glyph-Transform Metrics 菜单。

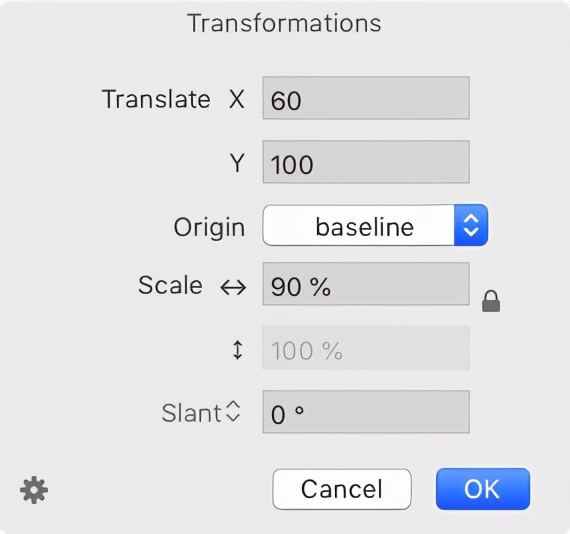
… the actual Paths > Transformations, …
…以及“路径-转换”(Paths > Transformations)…
… and Paths > Interpolate with Background:
还有“路径-背景插值”(Paths > Interpolate with Background)

All of that, by the way, helps reduce clutter in the Filter menu, so you can clutter it up again with the Plugin Manager, ha. More about that in a minute. A few other menu items got renamed into something more authentic:
Glyph > Create Composite (Cmd-Ctrl-C), formerly known as Make Component GlyphPaths > Other > Sharpen Corner (also in context menu), formerly known as Make CornerFilter > Shape Order, formerly known as Fix CompatibilityEdit > Paste Special (with the Opt key held down, Cmd-Opt-V) now allows you to paste glyphs as components into the selected target glyphs:
顺便说一句,所有这些改变都有助于改变滤镜菜单的混乱,所以你可以再次把插件管理器弄得乱七八糟,哈哈哈。关于这个晚点再聊。
有一些菜单被重新命名,更加贴近他们的功能:
● Glyph > Create Composite (Cmd-Ctrl-C),以前叫Make Component Glyph
● 路径-其他-锐化点(也在右键菜单中)以前叫“生成点”
● 滤镜 >形状顺序 以前叫“修复兼容性”
编辑-特殊粘贴(按住Opt键,Cmd-Opt-V)现在可以将字形作为组件粘贴到其他字形中。

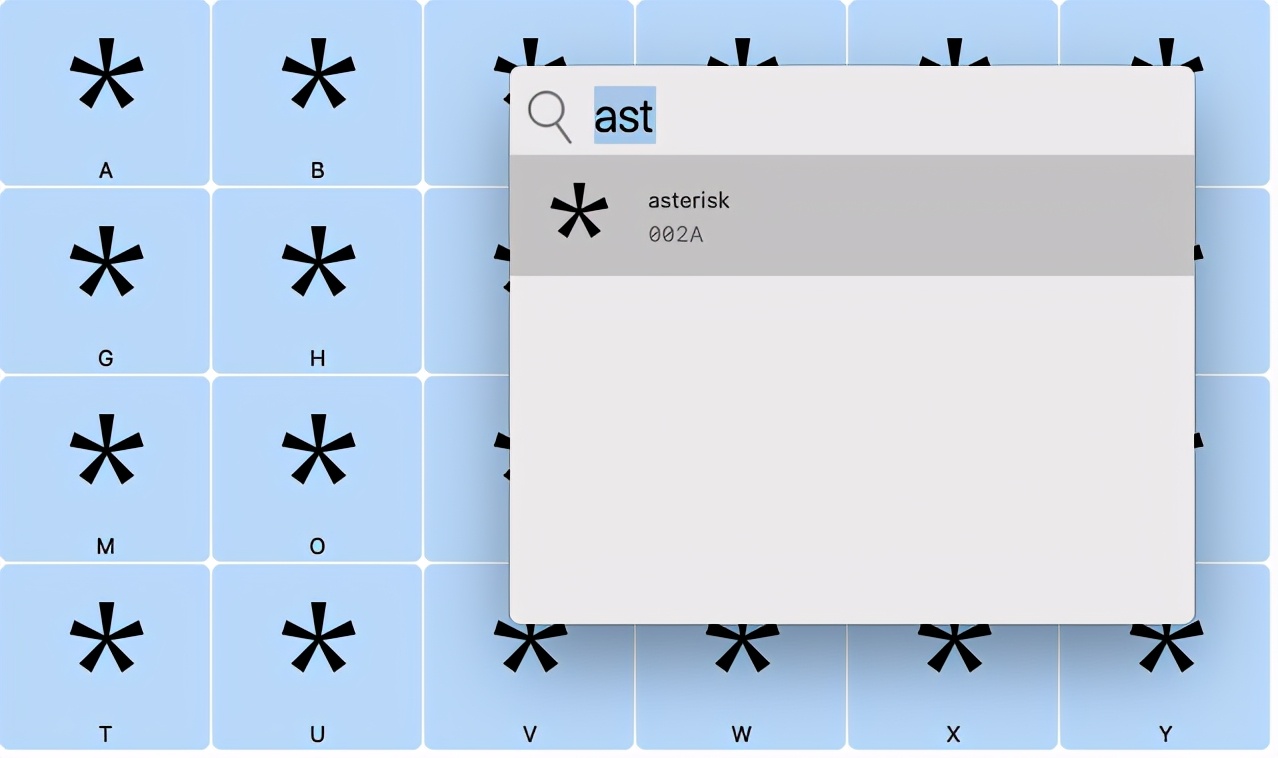
Alternatively, you can also add the same component into many glyphs at once with Glyphs > Add Component (Cmd-Shift-C):
或者,也可以使用Glyphs>add component(Cmd-Shift-C)将同一组件一次添加到多个glyph中:
未完,其余部分正在努力翻译中……
图片来自Glyphs官网:https://glyphsapp.com/news/glyphs-3-make-things-you-love
著作权归作者所有。
原文作者:Rainer Erich Scheichelbauer。16 November 2020 Published on 15 November 2020
版权声明:CosMeDna所有作品(图文、音视频)均由用户自行上传分享,仅供网友学习交流。若您的权利被侵害,请联系删除!
本文链接://www.cosmedna.com/article/179739487.html